[toc]
1. SpringMVC概述
- 一种轻量级的、基于MVC的Web层应用框架。偏前端而不是基于业务逻辑层,Spring框架的一个后续产品。是目前最主流的MVC 框架之一
- SpringMVC 3.0 后全面超越 Struts2,成为最优秀的 MVC 框架。
- Spring MVC 通过一套 MVC 注解,让 POJO 成为处理请求的控制器,而无须实现任何接口。
- 支持 REST 风格的 URL 请求。 Restful
- 采用了松散耦合可插拔组件结构,比其他 MVC 框架更具扩展性和灵活性。
1.1 SpringMVC应用范围
-
天生与Spring框架集成,如:(IOC,AOP)
- 进行更简洁的Web层开发
- 支持灵活的URL到
页面控制器的映射
- 非常容易与其他视图技术集成,如:Velocity、FreeMarker等等
-
因为模型数据不存放在特定的API里,而是放在一个Model里(Map数据结构实现,因此很容易被其他框架使用)
-
非常灵活的数据验证、格式化和数据绑定机制、能使用任何对象进行数据绑定,不必实现特定框架的API
- 更加简单、强大的异常处理
- 对静态资源的支持
- 支持灵活的本地化、主题等解析。
1.2 SpringMVC的使用
- 将Web层进行了职责解耦,
基于请求-响应模型
- 常用主要组件
- ①
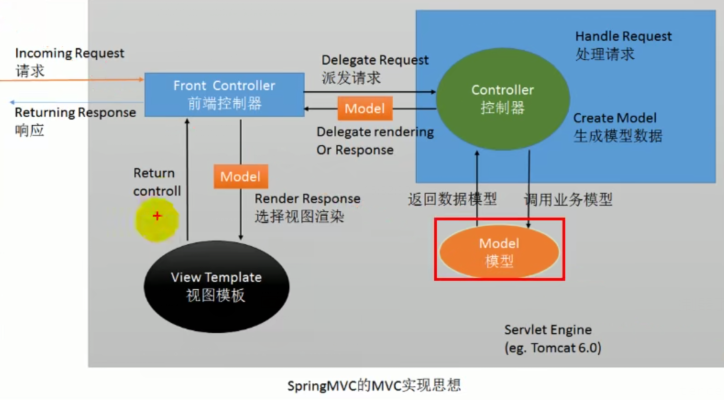
DispatcherServlet:前端控制器(核心控制器)
- ②
Controller:处理器 /页面控制器,做的是MVC中的C的事情,但控制逻辑转移到前端控制器了,用于对请求进行处理
- ③
HandlerMapping :请求映射到处理器,找谁来处理,如果映射成功返回一个HandlerExecutionChain对象(包含一个Handler处理器(页面控制器)对象、多个HandlerInterceptor拦截器对象)
- ④
View Resolver : 视图解析器,找谁来处理返回的页面。把逻辑视图解析为具体的View,进行这种策略模式,很容易更换其他视图技术;
- 如
InternalResourceViewResolver将逻辑视图名映射为JSP视图
- ⑤ LocalResolver:本地化、国际化
- ⑥ MultipartResolver:文件上传解析器
- ⑦ HandlerExceptionResolver:异常处理器
1.3 SpringMVC需要的环境
需要的jar包:
- spring-aop-4.0.0.RELEASE.jar
- spring-beans-4.0.0.RELEASE.jar
- spring-context-4.0.0.RELEASE.jar
- spring-core-4.0.0.RELEASE.jar
- spring-expression-4.0.0.RELEASE.jar
- commons-logging-1.1.3.jar
- spring-web-4.0.0.RELEASE.jar
- spring-webmvc-4.0.0.RELEASE.jar
1.4 SpringMVC流程

第一步:引入依赖
1
2
3
4
5
6
7
8
9
10
11
12
13
14
15
16
17
18
19
20
21
22
23
24
25
26
27
28
29
30
31
32
33
34
35
36
37
38
39
40
41
42
43
44
45
46
47
48
49
50
51
52
53
54
55
56
57
58
59
60
61
62
63
64
65
66
67
68
69
70
71
72
73
74
75
76
77
78
79
80
81
82
83
84
| <dependencies>
<dependency>
<groupId>org.springframework</groupId>
<artifactId>spring-context</artifactId>
<version>4.0.0.RELEASE</version>
</dependency>
<dependency>
<groupId>commons-logging</groupId>
<artifactId>commons-logging</artifactId>
<version>1.1.1</version>
</dependency>
<dependency>
<groupId>org.springframework</groupId>
<artifactId>spring-web</artifactId>
<version>4.0.0.RELEASE</version>
</dependency>
<dependency>
<groupId>org.springframework</groupId>
<artifactId>spring-webmvc</artifactId>
<version>4.0.0.RELEASE</version>
</dependency>
<dependency>
<groupId>javax.servlet</groupId>
<artifactId>javax.servlet-api</artifactId>
<version>3.0.1</version>
<scope>provided</scope>
</dependency>
<dependency>
<groupId>javax.servlet.jsp</groupId>
<artifactId>jsp-api</artifactId>
<version>2.2</version>
<scope>provided</scope>
</dependency>
<dependency>
<groupId>junit</groupId>
<artifactId>junit</artifactId>
<version>4.10</version>
<scope>test</scope>
</dependency>
<dependency>
<groupId>org.projectlombok</groupId>
<artifactId>lombok</artifactId>
<version>1.16.20</version>
<scope>provided</scope>
</dependency>
</dependencies>
<build>
<plugins>
<plugin>
<groupId>org.apache.maven.plugins</groupId>
<artifactId>maven-compiler-plugin</artifactId>
<version>3.8.1</version>
<configuration>
<target>1.8</target>
<source>1.8</source>
</configuration>
</plugin>
<plugin>
<groupId>org.apache.tomcat.maven</groupId>
<artifactId>tomcat7-maven-plugin</artifactId>
<version>2.2</version>
<configuration>
<port>8080</port>
<path>/</path>
<uriEncoding>UTF-8</uriEncoding>
</configuration>
</plugin>
</plugins>
</build>
|
第二步: 添加web.xml
在web.xml中配置 DispatcherServlet ( 前端控制器--SpringMVC核心控制器 ) ,加载配置文件springMVC.xml
1
2
3
4
5
6
7
8
9
10
11
12
13
14
15
16
17
18
19
20
21
22
23
24
25
26
27
28
29
30
31
32
33
34
35
36
37
38
39
40
41
42
43
44
45
46
47
48
49
50
51
52
53
54
55
56
57
58
| <?xml version="1.0" encoding="UTF-8"?>
<web-app xmlns="http://java.sun.com/xml/ns/javaee"
xmlns:xsi="http://www.w3.org/2001/XMLSchema-instance"
xsi:schemaLocation="http://java.sun.com/xml/ns/javaee
http://java.sun.com/xml/ns/javaee/web-app_3_0.xsd"
version="3.0">
<filter>
<filter-name>hiddenHttpMethodFilter</filter-name>
<filter-class>org.springframework.web.filter.HiddenHttpMethodFilter</filter-class>
</filter>
<filter-mapping>
<filter-name>hiddenHttpMethodFilter</filter-name>
<url-pattern>/*</url-pattern>
</filter-mapping>
<servlet>
<servlet-name>dispatcherServlet</servlet-name>
<servlet-class>org.springframework.web.servlet.DispatcherServlet</servlet-class>
<init-param>
<param-name>contextConfigLocation</param-name>
<param-value>classpath:springMVC.xml</param-value>
</init-param>
<load-on-startup>1</load-on-startup>
</servlet>
<servlet-mapping>
<servlet-name>dispatcherServlet</servlet-name>
<url-pattern>/</url-pattern>
</servlet-mapping>
</web-app>
|
第三步:添加SpringMVC.xml
加入 SpringMVC 的配置文件:springmvc.xml (读取要扫描的包 和 配置视图解析器InternalResourceViewResolver)
会做如下的解析:
- 通过
prefix + returnValue + suffix 这样的方式得到实际的物理视图, 然后做转发操作.
/WEB-INF/views/success.jsp
1
2
3
4
5
6
7
8
9
10
11
12
13
14
15
16
17
| <?xml version="1.0" encoding="UTF-8"?>
<beans xmlns="http://www.springframework.org/schema/beans"
xmlns:xsi="http://www.w3.org/2001/XMLSchema-instance"
xmlns:context="http://www.springframework.org/schema/context"
xsi:schemaLocation="http://www.springframework.org/schema/beans http://www.springframework.org/schema/beans/spring-beans.xsd
http://www.springframework.org/schema/context http://www.springframework.org/schema/context/spring-context.xsd">
<context:component-scan base-package="cn.justweb"></context:component-scan>
<bean id="internalResourceViewResolver" class="org.springframework.web.servlet.view.InternalResourceViewResolver">
<property name="prefix" value="/WEB-INF/views/"></property>
<property name="suffix" value=".jsp"></property>
</bean>
</beans>
|
第四步:创建入口页面index.jsp
1
2
3
4
5
6
7
8
9
10
11
12
13
14
15
16
17
18
19
20
21
22
23
24
25
26
27
28
29
30
| <%@ page contentType="text/html;charset=UTF-8" language="java" %>
<html>
<head>
<title>首页</title>
</head>
<body>
<h1>首页</h1>
<form action="/users/justweb" method="get">
<input type="submit" value="get请求">
</form>
<form action="/users/justweb" method="post">
<input type="submit" value="post请求">
</form>
<%-- 默认get请求 find --%>
<form action="/users/justweb" method="post">
<input type="hidden" value="put" name="_method">
<input type="submit" value="put请求">
</form>
<form action="/users/justweb" method="post">
<input type="hidden" value="delete" name="_method">
<input type="submit" value="delete请求">
</form>
</body>
</html>
|
第五步:业务控制器
1
2
3
4
5
6
7
8
9
10
11
12
13
14
|
@Controller
@RequestMapping("/user")
public class HelloWorldController {
@RequestMapping(value = "/justweb" )
public String hello(){
return "success";
}
}
|
第六步:成功的页面
success.jsp
1
2
3
4
5
6
7
8
9
10
| <%@ page contentType="text/html;charset=UTF-8" language="java" %>
<html>
<head>
<title>跳转成功</title>
</head>
<body>
<h1>访问成功</h1>
</body>
</html>
|
1.5 具体步骤

客户端点击链接发送http://localhost:8080/users/justweb
来到tomcat服务器
Springmvc的DispatcherServlet (前端控制器)收到所有的请求。
由DispatcherServlet 前端控制器查询一个或多个HandlerMapping,找到处理请求的Controller
DispatcherServlet将请求提交到 Controller(也称为Handler)
Controller调用业务逻辑处理后,返回ModelAndView
DispatcherServlet查询一个或多个ViewResoler视图解析器(InternalResourceViewResolver根据方法的返回值以后,进行拼接得到完整的页面地址),找到ModelAndView指定的视图。
视图负责将结果显示到客户端。
☆


